In this tutorial, you will use FacePoser, Valve’s versatile and powerful choreography tool, to animate an NPC actor's spoken sentence, adding appropriate facial animation and body gestures. Although animation for all of the voice acting used in the game already exists, in the form of .vcd files, it's much easier to use Valve's pre-made dialogue and models to start out in FacePoser. This tutorial does not assume competence with FacePoser, though at least a basic understanding of other animation software such as Flash would be helpful.
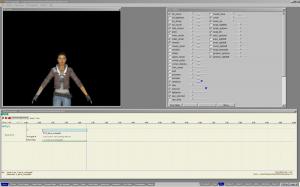
Open FacePoser from your Source SDK menu.

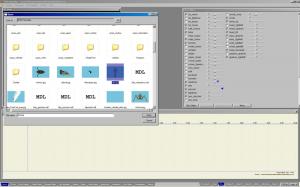
From the top, select File, then select Load Model.
Scroll down the list until you find Alyx. Double click on the Alyx Model.
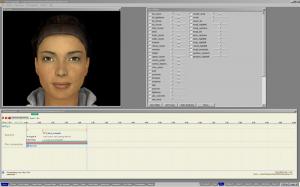
The model should appear in the 3d view on the top right. If the 3d view is not visible, open it from Window--3D view.
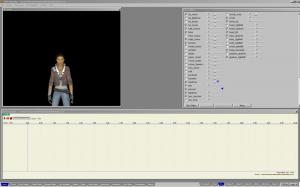
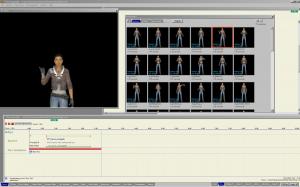
The only windows that need to be open on the screen right now are the 3D view, the Flex Sliders (on the right), and the Timeline (at the bottom). Close any other open windows.
You need to designate this model as your actor. Go to the Timeline at the bottom, and right click anywhere on it. Select New--Actor. You then have the option of naming the actor whatever you want. Their name is important, as it’s used in conjunction with the logic_choreographed_scene necessary for importing this scene into a Hammer map. Let’s just name it Alyx for now. A tab will be created on your timeline entitled Alyx.

Your actor now needs a line to speak. Basically, whenever a new event is loaded, such as a new gesture or a new line of dialogue, it requires its own channel, (similar to a layer in Flash) under its actor’s tab. To create a new channel, right click on the Alyx tab. Select New--Channel. You will be prompted to enter a name for the channel. Since this is the layer of the scene which holds the actor’s spoken dialogue, name the channel Speech. The new channel will appear under the actor’s tab.
All of an actor’s channels can be collapsed by clicking the blue arrow next to their name.
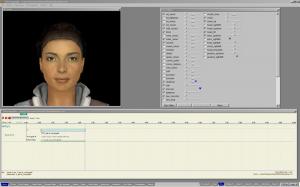
You now need to add a line of dialogue to the Speech channel. Right click on Speech, select Wav File. This is FacePoser’s recognized format of spoken dialogue.
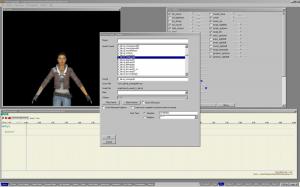
Here, you can browse Valve’s recorded dialogue used in Half-Life 2, and by clicking Play Sound, you can listen (most of) them. Select K_lab.al_comingwith. For some reason, you need to manually type in the entire name in the Name bar at the top before clicking OK. Don’t ask me why.
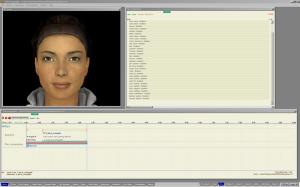
The dialogue will appear in the Timeline at the bottom, in the Speech channel.

You may need to drag it out a bit, as it usually starts too far back.
By clicking the red Play button above your timeline, or by dragging the green handle of the Control Bar, you can play the scene so far, and see your actor speaking the line in the Wav file. Since this dialogue is pre-recorded by Valve, the phonemes are already extracted, (meaning that you don’t have to worry about lip synching it).
Select Options, and click on Center on Face.
Now would be a good time to play around with the Flex Sliders, in the window on the right of your screen. These are used to create a Static Expression. This is used for making an Actor hold a certain expression for a long time, or in situations where you want the same expression used many times. It basically sets the actor’s default face for the entire scene. Just drag the sliders left or right to manipulate the actor’s facial muscles. Create whatever messed up faces you want, just to get a feel for how the sliders work.
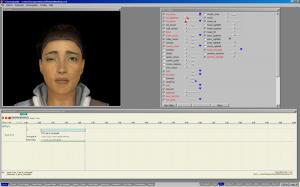
When you’re finished, click Zero Sliders to set it to your actor’s default face.
Now, you’re going to add facial animation to the scene. This is referred to as Flex Animation. This can get VERY complex, and the Valve Developer Community site puts it very nicely: Creating Flex animation is a large step up from creating a static Expression. You now have to concern yourself with movement and timing, adding a whole new dimension to your work. Don't expect to step straight in and produce animated Flex as well as you can produce static!
(For more on Flex Animation from Valve, go to Developer.valvesoftware.com)
Create a new channel, as you did before. Name this channel Flex Animation.
Right click on the new channel and select Flex Animation. It doesn’t matter what you name it. I’ve called mine Alyx Flex. It will appear as a red bar on your timeline. Drag it out (as I have done) so it starts at the very beginning of the scene, and ends a few seconds after the dialogue stops.
With the Flex Animation selected, go to Window, and open the Expression Tool.
The expression tool window is where you will create your Flex Animation for the scene. I’m not going to go really in depth here, but I’ll try to explain the basics.
Think of this window as another view of the timeline, and the different facial sliders are the channels. Within this window, you can drag the green control bar, just as in the normal timeline, and watch the expressions you’ve created so far, but without the dialogue and corresponding lip synching.
You’re now going to add control points to adjust a facial slider. Double click on Inner Raiser, one of the disabled sliders, to open and enable it.
By control clicking in the Inner Raiser area, you can create what are called Control Points. Control points are keyframes in the facial animation that the program tweens between for you. The higher a control point is on the timeline, the more ‘intense’ the expression, i.e. The wider the smile, etc. By creating a few control points in a gentle curve, you can make the actor’s eyebrows slowly and smoothly rise.
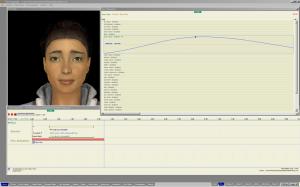
By sloping the line back to the bottom, the eyebrows are lowered. By clicking the red play button on your normal timeline, you can play the scene so far, and see how your expression looks.
You can add control points to different facial sliders to create facial animation for Alyx’s spoken line of dialogue. Since Alyx is being friendly and reassuring, a suitable expression would be leaning forward, inner eyebrows rising, and a slight head tilt, followed by a reassuring smile.
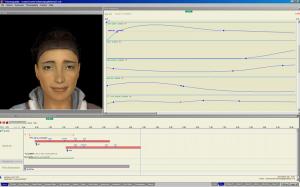
Once you have facial animation that you’re happy with, you can add Gestures to the actor.
A gesture is just that: a single motion that the actor makes with their hands or body. These can be overlaid on top of each other, so that they look more natural. To add a gesture, select Window--Animation Browser.
Here, you can see a list of all of the loaded model’s (Alyx’s) pre-made movements. Filter out all but the gestures by clicking the Gestures tab at the top of the window. You can watch a gesture in the 3d view by clicking and holding the mouse button on its thumbnail. Select A_gesture10p, one in which Alyx points over her right shoulder. Click and drag the thumbnail onto the timeline. Select OK, and enter whatever name you want for the gesture. It’s not necessary to create a new channel specifically for the gesture. It will rest on whatever channel you drag it onto, but it’s easy to differentiate it from other events on the timeline. You can see the gesture represented on the timeline in the same way as sounds or flex animation, and can drag it where you want it in the scene until you’re happy with its location. When you’re completely finished, go to the top of the screen, select Choreography--Save, and save it as whatever you want. It will be saved as a vcd, and can be accessed within Hammer using a logic_coreographed_scene.
These are the very bare-bones basics of FacePoser, and much much more is possible with the software. For questions or feedback, feel free to email (hambandito@gmail.com) or PM me.
-Psalm


Go to the top, select Window, and click on CChoreoView.
Psalm, you are awesome :D
Excellent, face poser tutorials are far and few between these days.
wooo. nice!
I don't have a timeline window. Can you help me?
I have the same problem but when I go to the CChoreoView I get a screen which says "No choreography scene file (.vcd) loaded"
What do I do?
Try going to Choreography---New, to create a new vcd, or Choreography---Load, and load an existing vcd. There's very little chance I will read the comments of all of my tutorials-email me if you have questions!
great tutorial!
Best EVER, this is the one thing i wasn't sure of.
you have made my day =D
Sucks that this doesnt work on VISTA.. vista's a load of crap.
where are those WAV files?
Thanks dude! It was a lot of help
whenever I go into faceposer, the 3D view is always just a black void even if I load a model